GAIA astrometric calibration
GAIA makes extensive use of the Starlink AST library, the most obvious
of which is it's ability to display celestial coordinates sourced from
FITS and NDF data files, but it is also capable of much more
sophisticated astrometric functions. A quick list of these is:
-
Viewing the offsets between positions.
-
Plotting astrometric grid overlays.
-
Contouring images using astrometric alignments.
-
Changing to other celestial coordinate systems (FK5, FK4,
Galactic, SuperGalactic, Ecliptic).
-
Interactively creating astrometric calibrations.
Much of this is referenced in the on-line help.
The following images show GAIA performing one of the possible
methods that you could use to astrometrically calibrate an
image. In this case it is assumed that you know the rough centre,
orientation and image scale.
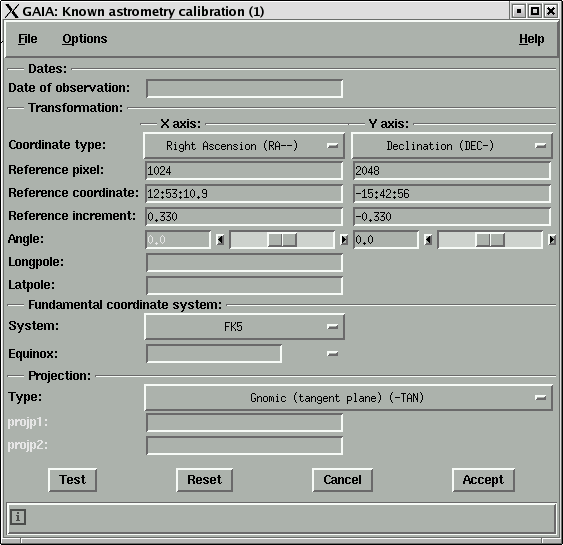
After displaying your image you should select the
"Image-Analysis"->"Astrometry calibration"->"Type in known
calibration" toolbox. In this you can enter the image centre,
scale and orientation (in this case flipped top to bottom and
left-right as shown by the signs of the increments, for North at
the top and East to the left the signs would be reversed). Press
"Test", "Accept" and your image now has a rough calibration.
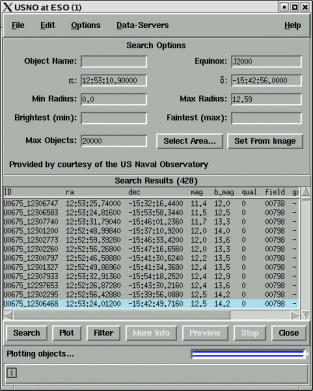
The next stage is to get some reference positions from an
on-line catalogue. Choose "Data-Servers"->"Catalogs"->"USNO at
ESO", press "Search" and you should get a list of positions that
are displayed as circles with interior crosses over your image.
Ignoring the magenta circles it should look something like:
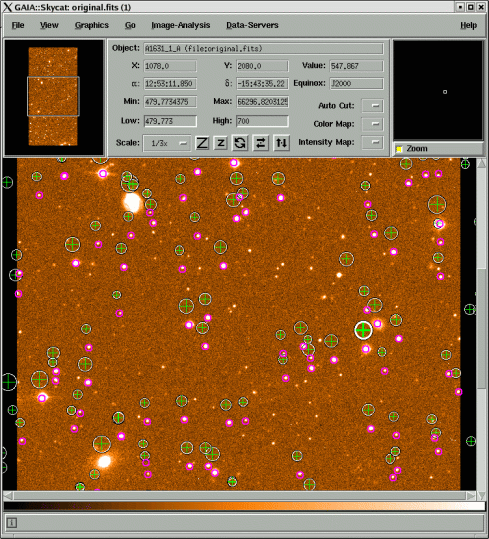
If you're good or lucky then you should be able to spot the
pattern between the USNO positions and your image, if not go back
and check the bootstrap data, get a new initial solution and
then press "Plot" in the catalogue window to refresh the
positions.
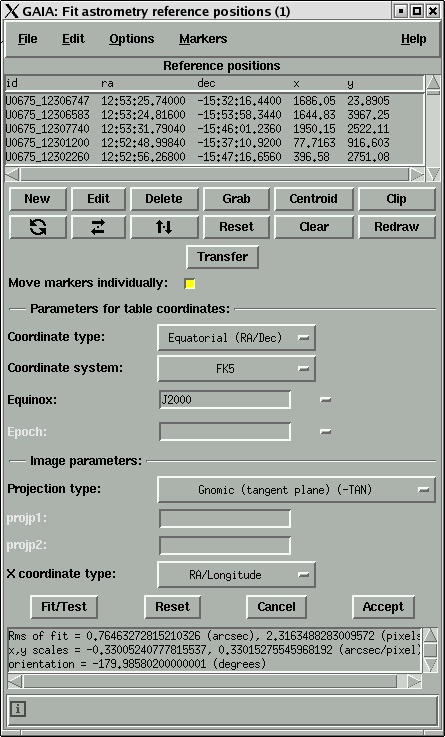
The next stage is to use these positions to fit a proper
solution. To do this open the
"Image-Analysis"->"Astrometry calibration"->"Fit to star positions"
toolbox.
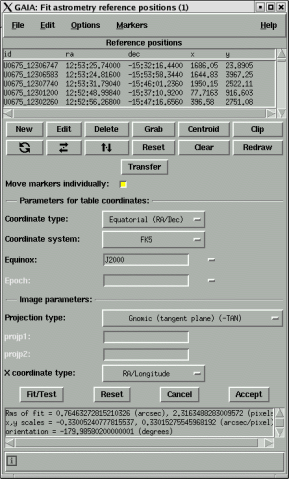
Press the "Grab" button and choose the USNO catalogue. This copies
the reference positions. Now you need to place the magenta circles
in the correction positions. In this example I just unticked
"Move markers individually" and moved all the positions together
(by dragging on a circle until in was in the right place). I then
unticked this option, pressed "Clip" to remove any positions not
on the image, had a quick scroll around to remove any clearly bad
positions and pressed "Centroid" to position the circle accurately
and finally "Fit/Test" to get the accurate solution. The final act
was to save the image to disk with it's new astrometric
calibration.
As I said above this is just one way to get a solution, you can
also transfer reference positions from another image (probably DSS
downloaded using "Data-Servers"->"Image Servers"), copy a solution
from another image (another type of bootstrap), or refine an
existing solution by adding in changes.
In the near future it should also be possible to achieve much of
what has been described here "automatically" using a new tool
"Autoastrom" (in fact a solution for this image has been produced
in that way)...
|