A new window on CCD data reduction
Users of the new version of CCDPACK (V2.0) might be forgiven for suffering a
little culture shock, for this release not only introduces a new graphical user
interface (GUI) but also breaks the mould of running a series of programs to
reduce your CCD data.
Rather than presenting you with a button to "flat-field" your CCD
frames, for example, the new interface concentrates on organising and
categorising your data. Once this is done, the necessary processing steps are
deduced and executed automatically. The approach bears more resemblance to the
software you might run on your PC than to traditional astronomical data
reduction software.
The decision to do things this way was determined in large part by the
response to the last Starlink Software Survey, which showed a need for both
software and documentation to be more approachable, tutorial and intuitive. In
the new CCDPACK, software and documentation have therefore been closely
integrated -- into a form of "interactive cookbook" that guides you
through each decision, presenting and describing the options available at each
stage.
Using this, you should be able to achieve high-quality results quickly and
easily, even if you initially know little about CCD systems. Along the way, you
will be introduced to each of the important factors that influence CCD data
reduction, so that you quickly learn how to make the crucial decisions that
affect your data. Even for more experienced users, the new interface presents a
convenient and time-saving alternative to running the underlying CCDPACK
programs directly.
These programs (makecal, calcor, makeflat, etc.)
remain at the core of the new system but have been augmented by a new schedule
command that decides how to reduce your data from the information you supply
(using your preferences if several approaches are possible). Reductions can even
be stopped mid-way and continued later from where you left off. It is schedule
that lies beneath the GUI and allows it to talk about instruments, filters and
data frames, rather than the low-level details of how to process the data. This
scheme differs from the equivalent ccdproc procedure in IRAF/CCDRED in
that it completes the reduction in one pass and of course you don't have to know
much about it anyway; if you use the GUI.
Infra-red data reducers shouldn't feel left out as the GUI also has features
for handling infra-red array data. These include the option to remove a zero
bias contribution (a necessary fudge) and to re-use images as flatfields.
CCDPACK also has facilities for registering, aligning and normalizing frames so
that large mosaic images can be produced. It is fully described in SUN/139 which
can be viewed on-line from the xreduce GUI or by using the ccdwww
command.
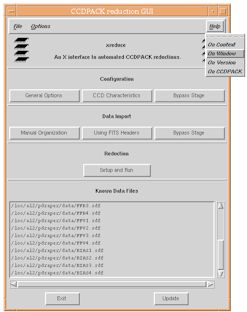
Figure 1: The main window of the CCDPACK GUI (xreduce).
Probably the first thing you will want to do here is pull down the Help menu
and select "On Window". This starts a World Wide Web browser that lets
you read about the window and CCD data reduction in general. Selecting `On
Context' tells you how to get help about a particular part of the window -- just
place the pointer over the bit you're interested in and press the F1, F2 or Help
key.
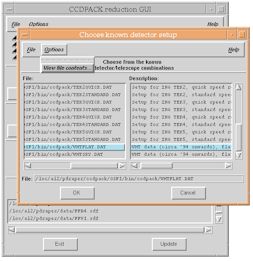
Figure 2: CCDPACK already knows about the characteristics of many CCD cameras
and this window allows you to select one of these standard configurations (or
you can define your own).
This also allows xreduce to understand your data better. For
example, if you have WHT data from around 1994-ish onwards, then its header
information contains enough detail to allow it to be reduced automatically. All
you need to do is identify your data files (this is done in a separate window)
and tell xreduce to reduce them.
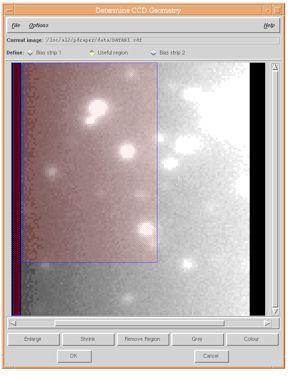
Figure 3: If your CCD camera isn't already known to CCDPACK, then you will
need to supply some information about it. The most important parameters are the
extents of the light-sensitive area and the bias strips. If you don't happen to
know these, then help is at hand -- in this window you can pan and zoom the
image and select the regions you want by dragging the mouse.
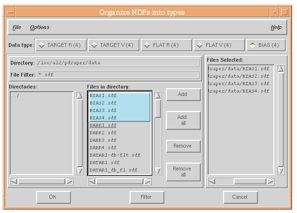
Figure 4: Unless your frames already contain this information, you may have
to identify which ones are "targets" (i.e. astronomical
objects), "flats", "bias" frames, etc. This is done
in this window, where you can also categorise frames by filter colour. When
you've finished, this information is recorded inside the frames themselves -- so
you won't need to do it again.
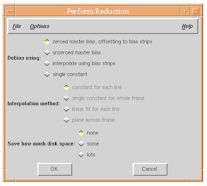
Figure 5: The last window in xreduce where you choose final options
before a reduction is scheduled and executed.
Note the save disk space option which deletes frames after processing.
Selecting "lots" will reduce your disk space requirement to just a few
frames more than the raw data, although your original data will be lost (you
should keep a tape copy). Selecting "some" saves less space but
retains the original data.
|