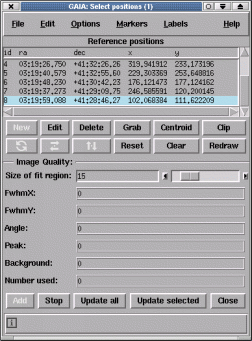
Just press the "Add" button. Now put your cursor over the first position you want to record and press mouse button 1. A position line should now appear in the "Reference positions" table. To add another position just press mouse button 1 on the image again. When you've completed identifying all your positions, press the "Stop" button.
To save your positions to a text file press the "File" menu and select the "Write positions to a file..." item. This creates a file selection window, just choose the file you want to overwrite or enter a new name. The format of the output file is just as you see in the table, a simple text file with spaces separating each field.
The simplest way to read in some positions that you want to identify or mark, is to read in a plain text file that has one of the following formats:
If you have an existing text file which doesn't have one of the formats above then this can be "imported" (i.e. you can read in different columns, use commas, tabs or fixed widths to separate fields etc.) using the toolbox created by selecting the "Import text file..." item in the "File" menu.
Finally catalogues that have been read in (by using the facilities available under the "Data-Servers" menu, i.e. local or remote catalogues) can be "grabbed". Just press the "Grab" button and select the window that displays your catalogue.
The easiest way to label your positions is by using the facilities in the "Label" menu. These use the values of the "id" column (which can be modified by editing each line of data). Once created the colour and font of the label can be changed. You can also reposition labels by clicking on one and then dragging it.
Further labels can be added using the graphics toolbox (see the "Graphics" menu in the main window).
If your input positions are in a different celestial coordinate system to that of the image, then you can transform them to match the image. Just read in your positions and select the "Precess sky coordinates..." item in the "Edit" menu. This reveals a new dialog window in which you can specify the coordinate system of the positions you've just read and transform them to the image coordinate system. Note all the input positions must be in the same coordinate system. Typical transformations available are: FK4 to FK5, FK5 to FK4, Galactic to FK4 or FK5 etc.
There is some usage help for the transform window:
There are many options for changing the colour and shape of the markers. Check out the item under the "Markers" menu. Note the size of the markers is related to the "Image Quality" estimates and is controlled by the "Size of fit region:" field.
If you have read a file containing incorrect X and Y positions (or suspect that the X and Y are no longer matched to the sky positions) then press the "Reset" button. This will update the X and Y positions to match ra and dec.
When you select a position on your image (using the "Add" facility) then the position is centroided (i.e. an attempt to automatically determine a local intensity peak is made). This is fine when you are selecting stars and small galaxies, but can be a problem for other objects. To switch this behaviour off de-select the "Auto centroid" item in the "Options" menu.
The most common reason why centroiding might appear to be not working is simply due to the accuracy of your initial positions. To make centroiding work harder to look for your objects, increase the search box and maximum shifts using the items under the "Options" menu.
The image quality facility is provided so that you can determine the mean seeing, shape and background values for the objects that you have selected. When you press either the "Update all" or "Update selected" buttons a 2 dimensional gaussian is fitted to each object, using a region of the size (side) shown in the "Size of fit region:" entry. All these fits are then averaged and the means are shown in the various fields.
If the number of objects used doesn't match the number that you've selected in the table then some fits have failed. The usual reason for this is not including enough space around the objects. Look at the size of the markers, these indicate the region that will be used.
The algorithm used is the same as that used in the "Pick Object" toolbox available in the main window under the "View" menu. This can be used to monitor single objects in different images.