WARNING --- the patched image just exists in memory to keep the changes you must use the "Save as..." option in the main windows "File" menu. If you want to use other toolboxes on this modified image you must then redisplay it.
The patch is created from a surface fit to the data contained in the annulus or sky apertures (the "background" region). This fit is then used to interpolate under the object aperture(s) (the "replacement" region). The deviations of the fit from the data in the background region are then used to estimate a noise factor. Values typical of this noise factor are then used to modify the surface fit resulting in a patch that looks just like the data in the background region, but that smoothly varies with the same gradient.
To move a region about on the image just place your cursor some where within the region and press and hold down button 1. Moving the mouse now moves the region.
If you "select" a region (by pressing button 1 somewhere within it), its colour will change and little boxes (called grips) will appear somewhere on its locus. Just put your cursor over a grip, press and hold down button 1, and then move your mouse. The shape will now resize following your mouse about the screen.
To delete a region, select it and then press button 3 down when your cursor is over the region you want to delete. A menu will now appear. Just choose "Delete selected items" and it will be deleted.
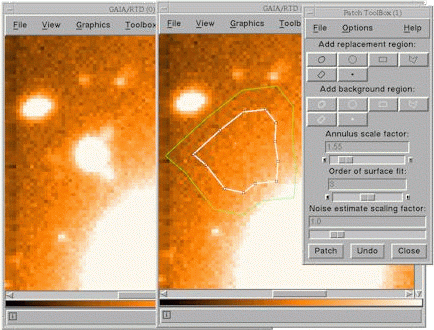
Pull down the menu "Options" and select the "Fit background using an annulus" option. This will now enable the buttons under "Add background region:" (which should have been previous grayed out). You can now define as many regions as you like using these buttons. When you press the "Patch" button these regions are now used to do the surface fit (to any regions you defined from the buttons under "Add replacement region:") and noise estimates.
All the shape buttons can be used to define arbitrary regions for to be patched and to be used for the surface fit used to create the patch.
Sorry this isn't possible.
You can save descriptions of the regions you have defined into one or two files (two are necessary when you don't use annuli for the background). Just open the "File" menu, select the save options for the replacement and maybe background "regions" (these are actually saved as ARD descriptions). Now you can read these regions back after displaying a new image (or you could also displayed these in a cloned window, check the "New Window" option in the main windows "File" menu.
If a region completely overlays another then it may not be possible to select it (remember you can select a region anywhere within its boundaries). To get around this problem to need to "lower" the region below the one that is overlaying it. To do this place your cursor over the obscuring region and press button 3. A menu should appear. Select the option "Lower selected item(s)" to then try to select the region you really want to modify.
Just double click over a region to get a details window that shows its values. You can modify these and then press return to change the region.
Just select the region and press button 2 over a grip. A new point should appear which you can now adjust into the correct place.
Just select the region and press button 3 over the grip you want to delete. You cannot have less than 3 points.